Windows 10, Microsoft’s latest and probably the “last” operating system, has already been installed in 120 million devices worldwide. If you are among those who haven’t upgraded to Windows 10, I would recommend you to do so. And in case you are planning to dual boot Windows 10 with Windows 7 or earlier version of Windows, I will show you how you can do that.
What is Dual Boot?
Dual boot is the process of installing two or more operating systems side by side. You can choose to load any of these operating systems when your computer is booting.
Why Should I Dual Boot?
Different users have different reasons for dual booting. Some of the reasons can include: A user has the requirement of an older operating system due to compatibility issues, some older programs might not work in newer operating system like Windows 10, testing a new operating system while still having the older and familiar OS installed, or a person is just tech-savvy like me and want to have two or more operating systems for satisfying other purposes.
With Windows 7 support ending on 14th January, 2020, it would be a good idea to dual boot Windows 7 and Windows 10. This will allow you to have the latest, updated Windows while still letting you keep the good old Windows 7.
Can’t I Just Use Operating System Virtualization?
Of course you can, but in that case you won’t be reading this. Virtualization software have higher system requirements and not every computer is capable of running two or more OSes simultaneously in a virtual environment.
Can I dual boot Windows 10 with Windows 8/8.1?
Yes. Follow the same steps as mentioned below to dual boot Windows 10 with Windows 8 or Windows 8.1.
How to Dual Boot Windows 10 with Windows 7?
Follow each of the given steps carefully in order. Pay attention to highlighted text for warnings.
Note: Remember that older version of Windows has to be installed first for dual boot to work with newer version. In simpler words: Windows 7 must be installed first and Windows 10 later. It can’t be the other way around.
Step 1: Taking backup
Backup your entire hard disk to an external source. You should backup the data in case anything goes wrong during/after installation and save yourself from regretting later.
Step 2: Creating a new partition
If your hard drive doesn’t have an extra partition where Windows 10 can be installed, you will need to create a new one. Make sure you have at least two partitions. One partition will be containing your Windows 7 and another one will carry Windows 10. If you already have an extra partition for installation, skip to Step 3.
Step 2.1
Click Start, click run (or simply press Windows key + R on the keyboard) and type diskmgmt.msc. Press enter. This will open the Disk Management window.
Step 2.2
You can see the current partitions here. Now right click on (C:) and click Shrink Volume.
We will need to shrink C: drive to make space for a new drive. Choose the shrink size accordingly. A standard Windows 10 installation will require at least 16GB for 32-bit and 20GB for 64-bit. If you are planning to install other programs, you will need free space accordingly.
We will need to enter shrink size in Megabytes. I will enter 18000 which should give me at least 17.5GB.
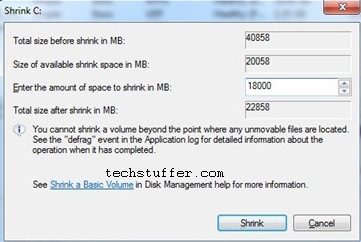
You can calculate the required space by multiplying GB with 1024. It will give you the amount in MB. For example, if you want to create a new partition of 30GB, you can calculate 30*1024 in calculator which will give you 30720. So enter 30720 under Enter the amount of space to shrink in MB area.
Click Shrink and wait until the process is finished. This will give you unallocated space of the amount you entered.
Step 2.3: Creating a new volume
We will now create a new volume and label it. Right click on unallocated space and click Create New Volume. Enter volume label such as Win10 to identify this volume during installation.
Step 3: Creating bootable media
Okay, now we have a separate partition. Now we will create a bootable media for Windows 10 installation. If you already have a Windows 10 installation media like a DVD or USB, you can skip this step.
Step 3.1: Download Windows 10 ISO
To create a bootable media, you will need a Windows 10 ISO file. You can download the latest Windows 10 ISO file from Microsoft Techbench.
Once on the Techbench software downloads page, scroll down and select the edition you would like to download. Click Confirm. After this, select language, for example, English, and click Confirm.

Now select whether you wish to download 32-bit or 64-bit edition. If you have 4GB or more RAM, 64-bit OS is recommended. Once the download is finished, you can continue creating an installation media.
Step 3.2: Creating a bootable USB
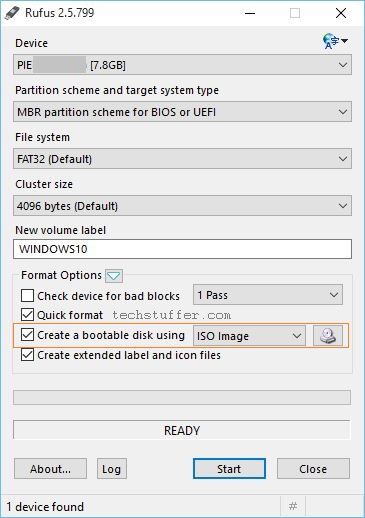
Download Rufus which will help us create a Windows 10 installation USB.
Launch Rufus and:
- Select your USB drive under Device.
- Select MBR Partitioning for BIOS or UEFI if you have non-UEFI drive. Newer devices usually have UEFI type firmware. In that case, select GPT partition scheme for UEFI to utilize native EFI mode.
- Choose FAT32 as the file system. Do not select NTFS.
- Select Create a bootable disk using option and change value to ISO Image.
- Browse to Windows 10 ISO file you downloaded and select it.
- Click Start.
- Close Rufus once the process is complete.
Step 4: Installing Windows 10 in the dual boot environment
Now we will install Windows 10 from the USB disk we created. If you skipped the previous step, you can continue with your Windows 10 installation media.
- Reboot your machine. Change BIOS settings to boot from USB drive first if not already done.
- Windows 10 logo should appear and stay for a certain amount of time. After which you should see the setup screen.
- Select basic options such as time and currency and click next. Click Install Now.
- Accept End User Agreement, click Next.
- Select Custom Install Windows only (Advanced) option.
- Now select the partition you created in step 2. It should display the volume label if and as you entered. If you did not, then it will display as Unallocated Space. Click Next.
- Windows 10 setup will now begin. Once the setup is finished, you should see the Choose an operating system screen each time your device boots. You can select either Windows 10 or Windows 7 to continue booting it.

That’s all, folks. You were reading How to Dual Boot Windows 10 with Windows 7 on techstuffer.com. If you found this article useful, please share it with others.
Support Me: If this article/tutorial helped you today, please consider supporting me and help me run frunction.com