Visitors, developers or search engines: everyone wants a fast website. The craze for speed has led website owners including myself to go crazy about making their sites faster. I have been through a stage when I spent hours and hours on improving my sites’ speed and solving all those flags shown on web page performance sites.
In order to get a faster website, I have ditched my old host in favour of DreamHost’s reliable hosting. I also made a lot of improvements on the back-end and had to stop using many third party services which I thought would have been ‘cool’ to place on my site.
My pursuit of speed made me go nuts but it also made me wiser. I have realised and will advise you too: Instead of spending countless hours on improving speed, focus on your site’s content. Use a reliable host, avoid scripts and use optimised images. This will do the most part for making your website fast. All other flags on those performance testing tools can wait.
I have also learned that every small step taken to improve a website’s speed helps. And one of those steps is to ditch Google Fonts in favour of loading fonts from your own server which brings me to the topic of this article.
Why Serve Google Fonts Locally?
Although not really necessary, you might want to self-host your fonts depending on different scenarios. Let me explain a few of them.
When you run a test on performance testing sites like Pingdom or GT Metrix, you will notice additional calls being made to Google in order to load CSS and fonts.

You may also notice ‘far-future expiration date’ flag being triggered as shown in the following screenshot.

Google’s services are blocked or have been blocked in past in a number of countries. Although highly reliable, Google’s service can see downtime, too. In both these cases, your visitors will see default fonts instead of custom ones. Loading them from your server will make sure they are not affected by such events.
By serving Google Fonts from your own server, it is no longer required to make extra requests to Google as your server will be serving CSS and font files itself. This will slightly reduce the page load time, too.
So, yes. Loading fonts from your server can be a good idea. And because you are reading this tutorial, I assume you already know the reason why you want to serve Google fonts locally.
The process of bidding farewell to Google Fonts requires following steps.
- Downloading font files and uploading them to your server.
- Generating CSS and making changes to your theme.
- Removing all references of Google Fonts from your site (optional).
My setup:
- WordPress v4.7.4. Tested up to v5.5.1
- Hosting on DreamHost. Tested with UpCloud VPS server + CyberPanel and SiteGround + cPanel.
- My fonts: Roboto Slab for headings and Merriweather Sans for main text.
Hosting Google Fonts Locally
Step 1: Choosing and downloading font files
The first thing we need to switch from Google Fonts is to choose our favourite fonts and downloading them to our computer.
To browse all available fonts on Google, go to fonts.google.com. Browse those fonts and choose the one that suits you. I suggest you select at least two different fonts: One for headings and one for the main text – if your theme allows it.
Once you have made up your mind on fonts, head over to Google Webfonts Helper tool. Now search for the fontyou chose above, select charsets (latin, latin-ext etc.), and styles (regular, bold, italic etc.) as required. I suggest you select all of these options. Click the Download button and you will get a zip file that contains your font.

Do this for all fonts you plan to use on your website. I will download Roboto Slab and Merriweather Sans.

Step 2: Uploading fonts to your server
Now it’s time to create a folder called ‘fonts’ somewhere on your server. I suggest something like public_html/wp-content/fonts. By choosing a path under wp-content, you are making sure these fonts won’t be removed the next time you update or change your theme.
I have changed the name of my wp_content directory to ‘files.’ So the font path in my setup will look like this: techstuffer.com/files/fonts.
Once the new directory is created, we will upload all font files to this folder. Below is how my fonts folder looks after I uploaded all files of my two fonts.

Step 3: Generating CSS and making changes to theme
Now go back to Google Webfonts Helper, search for your font, enter the path to your fonts directory you chose in Step 2. For example, https://yoursite.com/wp-content/fonts/. Now cpy the CSS code under ‘Copy CSS.’
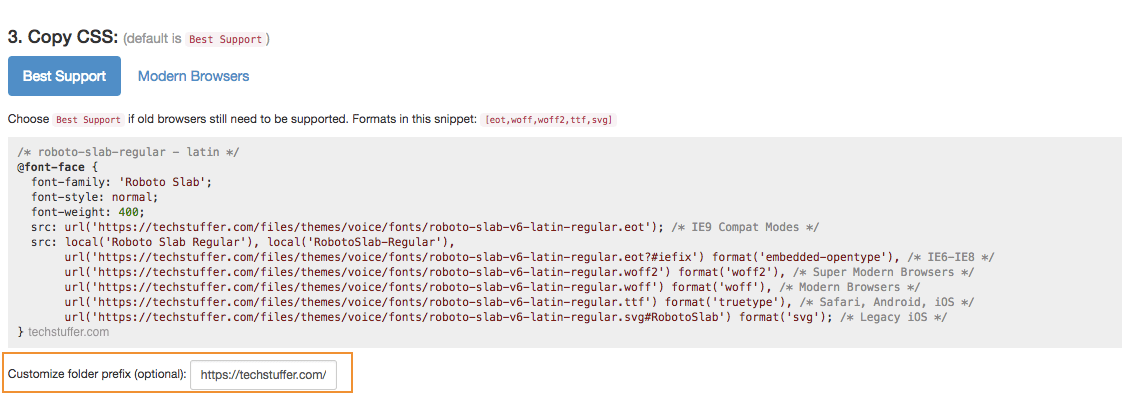
Now open a text editor on your computer and paste the CSS code for all fonts that you are planning to use. I will do this for Roboto Slab and Merriweather Sans.

Okay, now we have our favourite fonts already uploaded to our server. We also have the CSS code required to tell our theme to load selected fonts locally. And now, we will do just that.
In order tell our theme to load fonts from our local server, we will need to copy the CSS we got from Webfonts Helper and paste it into out theme settings.
I use Voice Magazine Theme by Meks which allows me to add custom CSS and Javascript codes without an additional plugin.
If your theme lets you do the same then go the settings/customisations of your theme and look for something like ‘Additional CSS.’ Now paste the CSS that you put in the text file and save the settings.
If your theme doesn’t support custom CSS option, you can use a plugin like Simple Custom CSS and JS which will let you add the CSS.
Once you add the CSS to your theme, your site is ready to load fonts from your server. But before that, clear all cache from any cache plugin you are using.
Step 4: Testing your setup
Now that you have uploaded your fonts and made required changes to your theme, your site should load fonts locally. To verify this setup, clear all cache on your browser (or use a different browser or use private/incognito mode) and open your WordPress site.
Right click and select View Page Source. Search for the name of your font (like Merriweather Sans in my case). You should be looking for a line that looks like the following.

Notice that my fonts are being loaded from the path I set in the step above. If this line still shows fonts.googleapis.com, there’s something wrong with your setup.
You should also check your site using Pingdom and GT Metrix to make sure your fonts are loaded from your own server and no call to fonts.googleapis.com is being made. Notice the difference in the screenshot below.

If your fonts are being loaded from your own server but you still see a call to fonts.googleapis.com being made, you might have to follow Step 5.
Step 5: Disabling Google Fonts reference (optional)
Note: This step is optional and depending on your site setup, there might be no other third-party calls being made to Google Fonts. In that case, you don’t need to follow this step.
On one of my sites, fonts were being loaded from my own server successfully, but there was one Google Fonts reference being made by WordPress. In that case, there’s basically no benefit even if you serve Google Fonts from your own server because the whole purpose of this is to stop making calls to Google.
To solve this, I use a plugin called Remove Google Font Reference which disables all references to Google Fonts. By disabling Google Font reference completely, we will make sure that no third party plugin, theme or WordPress itself is making any calls to fonts.googleapis.com.
After you activate this plugin and clear your cache, check one of your site’s pages using Pingdom or GT Metrix once again. Now there should be no reference to Google Fonts.
Good to know: Many themes and plugins include a reference to Google Fonts. They usually include an option to disable Google Fonts library, too.
Serve Google Fonts from Your Own Server: Summing Up
Serving Google fonts from your own server is not a complicated task. All you need to do is to download the fonts you want and upload them to your server. Then you will add a reference to the location of your fonts using a CSS file and you are done.
After you successfully complete all steps above, your WordPress site will serve Google Fonts from your own server. Those flags or warning appearing on performance testing sites related to this will also be gone. In addition to serving fonts locally, there’s a lot more you can do to improve the speed of your WordPress site. Learn how I ‘supercharged’ my blog to score 90+ in Google Pageseed.
That’s all from me, folks. I hope you found this tutorial helpful. If you get stuck somewhere, feel free to ask questions in comments.
Support Me: If this article/tutorial helped you today, please consider supporting me and help me run frunction.com